Step into any thriving Minecraft server or admire a seasoned builder's base, and you’ll quickly notice a powerful element adding personality, story, and practical utility: banners. These aren't just decorative blocks; they're the vibrant flags of your in-game identity, the crests of your grand designs, and the silent markers guiding your adventures. Understanding the craft behind popular Minecraft banner design ideas and patterns unlocks a whole new dimension of creativity, transforming simple wool and dye into iconic emblems that truly make your world your own.
This isn't just about slapping a few colors together. It's about designing a visual language, whether you're recreating a legendary symbol, designing a unique faction flag, or just adding that perfect touch of flair to your castle walls.
At a Glance: Crafting Banners Like a Pro
- More Than Decor: Banners serve as personal signatures, navigational aids, faction symbols, and even customizable shields (Java Edition).
- Simple Start, Complex Potential: Begin with wool and a stick, then layer dyes and special pattern items at a loom for intricate designs.
- Master the Loom: This workstation is your best friend for quickly applying multiple patterns and experimenting with layer order.
- Iconic Designs: Recreate classic symbols like the Creeper face, Pokeballs, or even terrifying mob visages like the Warden and Wither.
- Advanced Techniques: Use banners for map markers, glowing effects (1.17+), and personalizing shields.
- Community & Lore: Draw inspiration from popular SMPs like Hermitcraft and Dream SMP to create banners steeped in lore.
- Display Matters: Strategically place banners to enhance builds, mark territories, or even act as functional signs.
The Unsung Canvas: Why Banners Matter in Your Minecraft World
In a world made of blocks, every detail counts. Banners are a deceptively simple yet profoundly impactful feature, allowing players to infuse their builds and identity with unique visual flair. Think of them as the heraldry of your digital domain, telling stories, conveying messages, or simply adding a splash of color where it's most needed.
Beyond pure aesthetics, banners offer tangible benefits. They can act as intuitive waypoints on your maps, helping you navigate vast landscapes or find your way back to that secret base. For multiplayer enthusiasts, they are the ultimate tool for faction identification, instantly distinguishing friend from foe. On Java Edition, they even allow you to brandish your custom crest directly on your shield, a true mark of a seasoned adventurer. From a subtle decorative touch in a cozy cottage to a grand statement adorning a towering fortress, banners are essential storytelling tools that bring your Minecraft narratives to life.
Getting Started: Your Banner Crafting Blueprint
Before you can weave intricate tales with wool and dye, you need to understand the fundamentals. Crafting banners is a straightforward process, but knowing your materials and workstations will make your design journey much smoother.
The Core Ingredients: Wool, Sticks, and Dyes
Every banner begins with two simple components:
- 6x Wool: This determines your banner's base color. With 16 different wool colors available, your foundational choice sets the tone for your entire design.
- 1x Stick: This acts as the structural support for your banner.
Combine these in a crafting table to create your blank banner.
Once you have your base, the real magic begins with Dyes. Minecraft offers 16 distinct dye colors, each derived from various plants, minerals, or even mobs. These dyes are crucial for adding patterns to your banner.
Finally, for more intricate or specific designs, you'll need Pattern Items. These special items—ranging from specific blocks to mob drops—unlock unique, non-geometric patterns at the loom: - Creeper Head: For the iconic Creeper face pattern.
- Skull Charge: Creates a Wither Skull pattern.
- Flower Charge: Adds a flower pattern.
- Mojang Banner Pattern (Enchanted Golden Apple): Unlocks the 'Thing' pattern (Mojang logo).
- Snout Banner Pattern (Piglin Snout): Available in Bedrock, creates a piglin snout.
- Bordure Indented Banner Pattern (Vine): Bedrock exclusive, creates a bordure indented.
- Tree Banner Pattern (Sapling): Bedrock exclusive, creates a tree.
- Globe Banner Pattern (Lapis Lazuli + Book + Gold Nugget): Available in Bedrock, creates a globe.
Workstations: Loom vs. Crafting Table
While you can technically apply patterns using a crafting table, the Loom is your dedicated banner design station and vastly superior.
- Crafting Table: Used for the initial creation of a blank banner (6 wool + 1 stick). You can add patterns here by combining a banner, dye, and arranging them in specific shapes, but it's slow and cumbersome.
- Loom: The undisputed champion for banner customization. Simply place your banner in the top-left slot, your dye in the top-right, and then select your desired pattern from the grid below. The loom instantly shows you a preview, allowing for rapid experimentation and layering. It's faster, more intuitive, and allows for more complex layering without memorizing obscure crafting recipes. If you're serious about banner design, master the loom.
Pattern Categories: Your Design Vocabulary
Minecraft banner patterns fall into a few broad categories, giving you a diverse vocabulary to work with:
- Basic Geometric: These are your fundamental shapes—stripes (vertical, horizontal, diagonal), crosses, squares, circles (dots), gradients, and borders. They form the backbone of most designs.
- Mob-Inspired: Iconic patterns derived from mobs, such as the Creeper, Wither Skull, and (Bedrock exclusive) Piglin Snout.
- Nature-Themed: Designs like the Flower Charge, Tree, Bordure Indented, and Snout (Bedrock exclusive) add organic elements to your banners.
Mastering the Loom: How Banner Patterns Work
The loom is where your design vision comes to life. Understanding how patterns layer and interact is key to creating stunning, multi-faceted banners. Each pattern you add becomes a new layer on top of the previous one. This means the order in which you apply patterns matters immensely. The last pattern you add will always be the most visible, potentially obscuring previous layers if not chosen carefully.
Think of it like digital art software: layers stack. You can start with a broad background shape, then add a central motif, and finally an intricate border. Experiment with different colors for each layer to create contrast and depth. Don't be afraid to try combinations; sometimes the most unexpected pairings yield the most striking results. For builders keen on mastering the fundamentals of Minecraft crafting, the loom offers a straightforward entry into advanced decorative techniques.
Want to play around with designs without gathering materials in-game? You can even Generate custom MC banners using online tools to preview endless combinations before you ever touch a loom. This can save you a lot of time and resources!
Iconic Emblems: Popular Minecraft Banner Design Ideas You Can Recreate
Now for the fun part: diving into popular and striking banner designs. From classic symbols to terrifying mob representations, these ideas will inspire your next build.
Classic & Recognizable Banners
These designs are instantly recognizable and versatile, perfect for adding a touch of personality to any base or server.
Classic Creeper Banner
This is arguably the most iconic banner in Minecraft. It's simple, effective, and a must-have for any Creeper farm or explosive-themed build.
How to Make It:
- Start: Craft a Lime Green Banner.
- Layer 1: Add a Black Pale (a vertical stripe down the center) using black dye.
- Layer 2: Add a Black Base (a horizontal stripe along the bottom edge) using black dye.
- Layer 3: Apply a Creeper Charge (using a Creeper Head and black dye).
- Optional Layer 4: Add a Black Bordure for a defined edge, if desired.
Pokeball Banner
Perfect for Pokémon-themed servers, gyms, or just showing off your fandom. This design is multi-step but highly customizable with different color choices.
How to Make It:
- Start: Craft a White Banner.
- Layer 1: Add a Red Base (red dye). This will form the top half of the Pokeball.
- Layer 2: Add a White Lozenge (a white rhombus in the center) using white dye. This will be the inner circle.
- Layer 3: Add a Black Stripe (a horizontal black stripe across the middle) using black dye. This separates the red and white halves.
- Layer 4: Add a Black Roundel (a black circle in the center) using black dye. This will be the outer button.
- Layer 5: Add a White Dot (a small white circle in the center) using white dye. This completes the button.
Nether Portal Banner
An easier-to-make banner that perfectly complements any portal area or Nether-themed build.
How to Make It:
- Start: Craft a Purple Banner.
- Layer 1: Add a Black Per Bend (a diagonal black stripe from top-left to bottom-right) using black dye.
- Layer 2: Add a Black Base (a black horizontal stripe along the bottom) using black dye.
- Layer 3: Add a Black Chief (a black horizontal stripe along the top) using black dye.
- Optional Layer 4: Remove the black border (by applying another pattern like a small dot of the base color on top, then applying a border of your base color to hide the black border).
Mystical & Monstrous Banners
For those who lean into the darker, more mysterious side of Minecraft, these banners feature fearsome mobs and legendary figures.
Herobrine Banner
Capture the iconic glowing eyes of Minecraft's most infamous urban legend. Excellent for scary builds, haunted houses, or just unsettling your friends.
How to Make It:
- Start: Craft a Gray Banner.
- Layer 1: Add a Black Per Bend Sinister (diagonal stripe from top-right to bottom-left) using black dye.
- Layer 2: Add a Black Per Bend (diagonal stripe from top-left to bottom-right) using black dye.
- Layer 3: Add a Cyan Chief (top horizontal stripe) using cyan dye for the eyes.
- Layer 4: Add a Black Base (bottom horizontal stripe) using black dye.
- Layer 5: Add a Black Fess (middle horizontal stripe) using black dye, leaving just the cyan eyes exposed.
Wither Banner
A detailed, three-headed design suitable for marking your Wither-fighting arena or as a warning sign.
How to Make It:
- Start: Craft a Black Banner.
- Layer 1: Add a White Chief (white stripe at the top) using white dye.
- Layer 2: Add a Black Fess (black horizontal stripe across the middle) using black dye.
- Layer 3: Apply a Skull Charge (using a Wither Skeleton Skull and black dye).
- Layer 4: Add a White Base (white stripe at the bottom) using white dye.
Warden Banner
A truly terrifying and detailed design perfect for Deep Dark themed bases or "Warden containment" areas. It ingeniously uses the Creeper pattern to simulate the Warden's glowing core.
How to Make It:
- Start: Craft a Gray Banner.
- Layer 1: Add a Light Gray Pale (vertical stripe) using light gray dye.
- Layer 2: Add a Black Base (bottom stripe) using black dye.
- Layer 3: Add a Black Chief (top stripe) using black dye.
- Layer 4: Apply a Creeper Charge (using a Creeper Head and blue dye) for the glowing "heart."
- Layer 5: Add a Light Gray Pale Dexter (right vertical stripe) using light gray dye.
- Layer 6: Add a Light Gray Pale Sinister (left vertical stripe) using light gray dye.
- Layer 7: Add a Black Bordure for a clean, ominous border.
Weathered Creeper Banner
An enhanced, "scarier" version of the classic Creeper, often using subtle color shifts to create a worn or aged effect.
How to Make It:
- Start: Craft a Dark Green Banner (or a combination of green and gray for a mottled base).
- Layer 1: Add a Black Per Bend Sinister (black diagonal from top-right to bottom-left).
- Layer 2: Add a Black Per Bend (black diagonal from top-left to bottom-right).
- Layer 3: Apply a Creeper Charge (using a Creeper Head and a slightly lighter green or lime green dye) so it stands out against the dark background.
- Layer 4: Add a Gray Chief (top horizontal stripe) for a weathered effect.
- Layer 5: Add a Gray Base (bottom horizontal stripe) for further weathering.
Regal & Majestic Banners
For grand builds, castles, or claiming your noble lineage, these designs exude power and elegance.
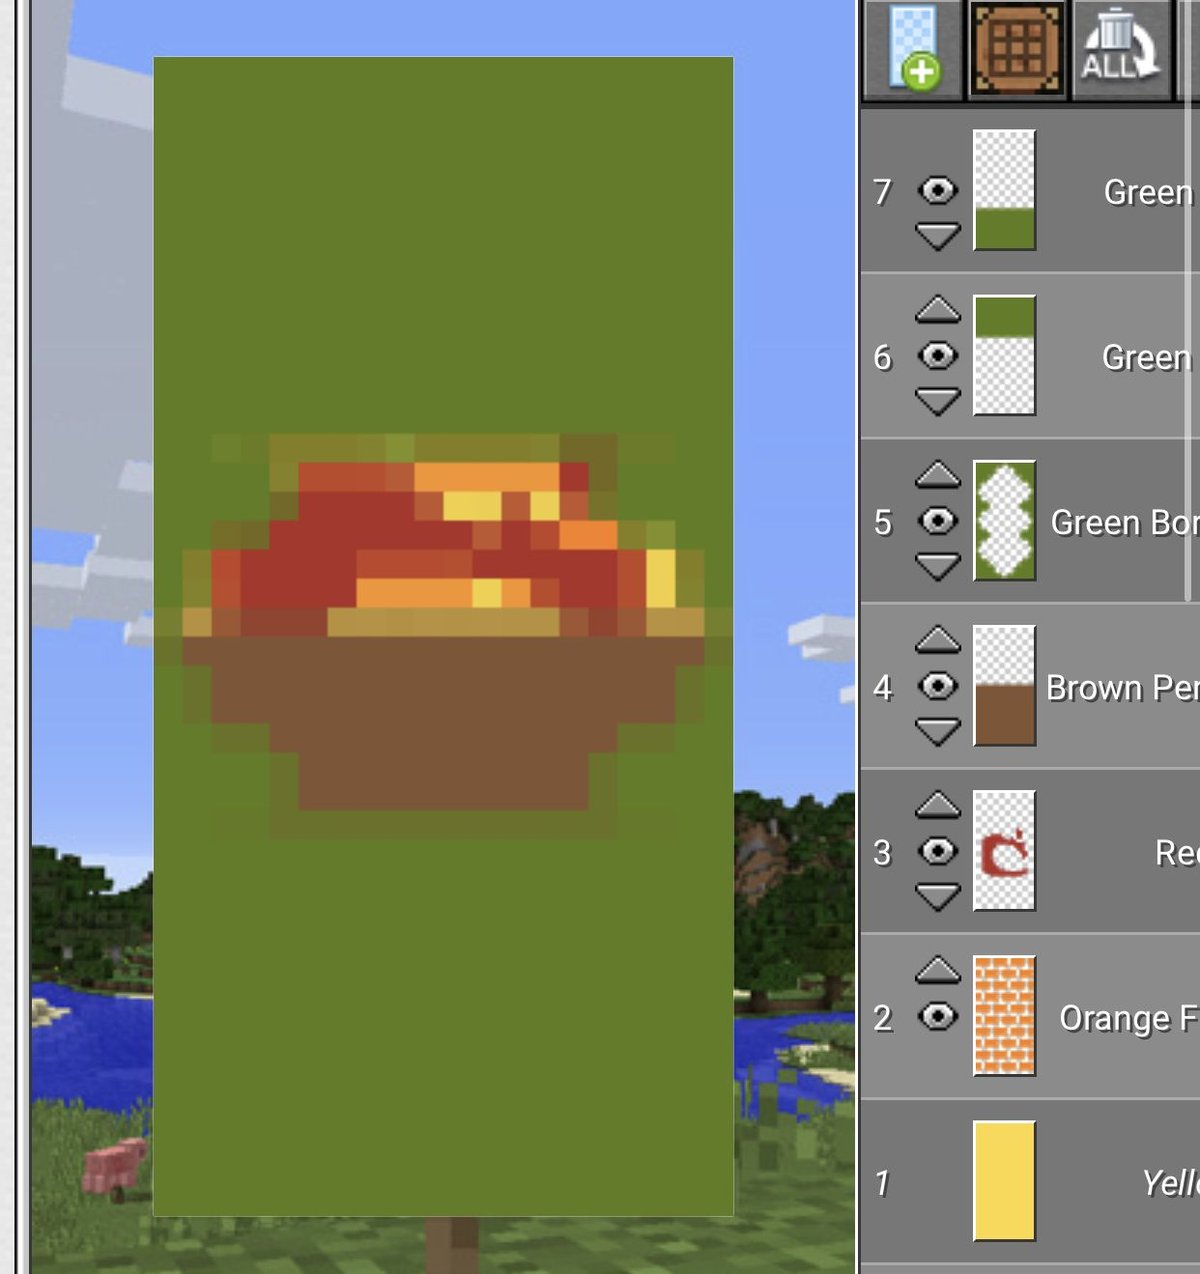
Phoenix Banner
A refined, regal design that is highly customizable in terms of colors and fade effects. Ideal as a base crest, suitable for castles or mansions.
How to Make It:
- Start: Craft a Black Banner.
- Layer 1: Add a Yellow Pale (vertical stripe in the middle).
- Layer 2: Add a Yellow Fess (horizontal stripe in the middle).
- Layer 3: Add a Red Gradient (top fading into red).
- Layer 4: Add a Orange Gradient (bottom fading into orange).
- Layer 5: Add a Red Bordure Indented (Bedrock) or a Red Bordure for a fiery outline.
- Layer 6: Add a Yellow Saltire (diagonal cross) to represent wings.
Royal Crest Banner
A classic emblem of royalty, perfect for throne rooms, castle gates, or declaring your domain.
How to Make It:
- Start: Craft a Purple Banner base.
- Layer 1: Add a Gold Saltire (diagonal cross) using yellow dye.
- Layer 2: Add a Gold Flower Charge (using a Dandelion or Poppy and yellow dye) in the center.
- Layer 3: Apply a White Bordure for contrast and definition.
Nature & Exploration Banners
Connect your builds to the natural world with banners that reflect landscapes, celestial bodies, or the mysteries of the deep.
Moon Banner
An artistic, simple design depicting a moon rising over a landscape, serene and elegant.
How to Make It:
- Start: Craft a Dark Blue Banner.
- Layer 1: Add a Black Base (bottom horizontal stripe) for the ground.
- Layer 2: Add a Gray Pale (vertical stripe) for a subtle mountain effect.
- Layer 3: Add a Yellow Chief (top horizontal stripe) for the sky.
- Layer 4: Add a White Roundel (white circle) in the upper half for the moon.
Ocean Explorer Flag
Perfect for ships, underwater bases, or any aquatic-themed build.
How to Make It:
- Start: Use a Blue Banner foundation.
- Layer 1: Add a White Bordure Indented (Bedrock) or a White Bordure using white dye, representing waves.
- Layer 2: Add a Light Blue Pale (vertical stripe) in the center.
- Layer 3: Add a White Flower Charge (using a Lily of the Valley and white dye) in the center, symbolizing marine life.
- Layer 4: Add a Yellow Chief (top horizontal stripe) for the sun or a distant sandy shore.
Beyond Decoration: Advanced Banner Techniques for Savvy Builders
Banners aren't just pretty pictures; they're functional tools that can elevate your gameplay and world management.
Shield Customization (Java Edition Exclusive)
One of the coolest features for Java players is the ability to apply your custom banner design directly to a shield. Simply combine a banner and a shield in a crafting table. The banner will be consumed, and your shield will display its intricate design when held or blocking. This is invaluable for:
- Faction Identification: Clearly distinguish team members in PvP or cooperative ventures.
- Personal Branding: Show off your unique crest as you explore dangerous lands.
- Roleplaying: Equip your guards with specific regimental shields in a castle build.
Unfortunately, Bedrock Edition players cannot apply banners to shields directly. This is a common point of confusion for players across platforms. If you find yourself unable to apply a banner to a shield, ensure you're playing Java Edition.
Map Marker System
Banners can transform your in-game maps into sophisticated navigational tools. When you place a banner at an important location, its icon will appear on any map held by a player if that banner falls within the map's loaded chunks.
- Color-Coding: Use different banner base colors to signify different types of locations (e.g., red for danger zones, green for safe houses, blue for water sources, yellow for mining outposts).
- Naming Banners: Right-click a placed banner with an anvil (or a name tag on a placed banner) to give it a custom name. This name will then appear on your map, providing incredibly useful information at a glance. Imagine a map dotted with names like "Iron Farm," "Villager Breeder," or "Portal to End." This system is invaluable for large bases or sprawling survival worlds.
Glowing Banners (1.17+): Light Up Your Lore
Since Minecraft 1.17 (Caves & Cliffs: Part I), you can add a luminous effect to your banners. By combining a banner with a Glow Ink Sac (obtained from Glow Squids) in a crafting table, your banner will emit a subtle, constant glow, making it visible even in complete darkness.
- Dark Builds: Perfect for spooky builds, ancient ruins, or underground bases where traditional lighting might ruin the aesthetic.
- Nether Bases: Ensure your important markers and signs stand out against the gloom of the Nether.
- Enhanced Visibility: Make faction flags or warning signs pop, day or night.
The glowing effect combines with all existing patterns and colors, offering another layer of customization to your designs. For those exploring different block palettes for your builds, glowing banners offer exciting new possibilities for lighting and visual interest.
Community Creations: Banners Inspired by Minecraft Lore & SMPs
The creativity of the Minecraft community is legendary, and nowhere is this more evident than in shared banner designs. Popular survival multiplayer (SMP) servers, with their rich lore and iconic characters, have inspired countless custom banners that players love to recreate.
Hermitcraft-Inspired Banners
The Hermitcraft server, known for its incredible builds and engaging personalities, has spawned a plethora of recognizable banners:
- Grian’s Poultry Man: An iconic, humorous persona. Recreate his chicken-themed banner, often featuring a red base with yellow and white patterns to resemble a cartoon chicken.
- Scarland Crest: Inspired by GoodTimesWithScar’s whimsical and often Disney-esque creations, these banners might feature ornate gold patterns on vibrant backgrounds, reminiscent of fantasy kingdoms.
- Boatem Pole: Representative of the Boatem crew, these banners typically incorporate aqua colors and patterns that evoke whales or ocean themes, reflecting their shared base.
Dream SMP References
The narrative-driven Dream SMP also generated flags and symbols that resonate deeply with its fanbase:
- L’Manburg Flag: A deeply significant banner from the server's lore, typically featuring black, yellow, and red horizontal stripes. This one requires careful layering to get the proportions right.
- Pogtopia Banner: Representing another faction, this banner often features raven imagery or darker, more rebellious aesthetics, sometimes utilizing feather patterns.
- Las Nevadas: The casino-themed city's banner would naturally incorporate gold and black designs, perhaps with geometric patterns or a subtle "money" motif.
These community-driven designs prove that banners are not just about aesthetics but about belonging, history, and shared experience within the vast Minecraft multiverse. When creating these, remember that a comprehensive guide to Minecraft dyes and their uses can help you select the exact shades to match the iconic inspirations.
Creative Display: Bringing Your Banners to Life
Designing a beautiful banner is only half the battle; knowing how to display it effectively is crucial to maximizing its impact. Strategic placement can transform a simple build into a narrative masterpiece.
- Castle Courtyards: Line pathways or castle walls with faction banners, proudly declaring ownership or allegiance. Imagine a grand entrance flanked by your custom crests.
- Shop Signs in a Marketplace: Instead of generic wooden signs, use a banner to represent what's sold inside. A sword banner for an armorer, a pickaxe for a tool shop, or even a cake banner for a bakery!
- Throne Room Statements: Display a giant, multi-block banner behind the royal seat in a throne room, reinforcing authority and grandeur.
- Ship Sails: On Java Edition, banners can be placed on item frames on ship masts to act as custom sails, giving your vessels unique character. On Bedrock, you can still place them on blocks to simulate sails.
- Tournament Grounds: Place team-colored banners on poles around an arena to clearly delineate team territories or cheer on competitors.
- Road Markers: Use them as wayfinding signs along long roads or trails, especially useful in conjunction with the map marker system.
- Building Facades: Add them to the exterior of buildings to break up monotonous walls and provide a pop of color or thematic decoration.
Thoughtful display turns your banners from mere decorations into integral parts of your world's design and story.
Troubleshooting Your Banner Blunders
Even seasoned builders encounter issues. Here are some common banner problems and how to solve them:
- "My patterns aren't appearing correctly, or they're covered up!"
- Solution: Layer order matters! The last pattern you apply at the loom is the top layer. If an important detail is hidden, you likely applied a larger, solid pattern after it. Re-craft the banner, applying the background layers first, then the central details, and finally any top-most elements or borders.
- "The colors of my banner look wrong when I place it underground or in a dark area."
- Solution: Minecraft's lighting engine affects how colors appear. A vibrant red banner might look dull and desaturated in low light. Always test your designs in lighting conditions similar to their final display location. If necessary, adjust dye colors slightly or consider making them glowing banners (1.17+) for dark environments.
- "I can't apply my banner to my shield!"
- Solution: Shield customization with banners is a Java Edition exclusive feature. If you're playing Bedrock Edition (on consoles, mobile, or Windows 10/11), this functionality simply isn't available. There's no workaround in Bedrock for this specific feature.
- "I ran out of dye/wool in the middle of a complex design."
- Solution: Always gather more materials than you think you'll need, especially for multi-layered designs. It's often helpful to keep a essential survival tips for new Minecraft players guide handy for efficient resource gathering.
Unleash Your Inner Artist: Banner Design Challenges
Ready to push your creative boundaries? Try these banner design challenges to hone your skills and populate your world with unique art:
- Family Crest: Design a banner that represents your in-game name, your playstyle, or your personal Minecraft "family." What colors and symbols best define you?
- Biome Banners: Create a unique banner for each distinct Minecraft biome. Think a snowy mountain peak for a tundra, a leafy pattern for a forest, or a fiery gradient for the Nether.
- Mob Zoo Collection: Design a banner for every hostile mob in Minecraft (and maybe some friendly ones too!). How can you capture the essence of a Zombie, Skeleton, Enderman, or even a Guardian using patterns?
- Seasonal Series: Develop a collection of holiday-themed banners. Spooky designs for Halloween, festive patterns for Christmas, or spring blossoms for Easter.
- Abstract Art: Challenge yourself to create banners that are purely aesthetic, focusing on color combinations, gradients, and geometric patterns without a specific real-world representation.
The world of Minecraft banners is as vast and imaginative as your builds themselves. By mastering the loom and understanding the interplay of colors and patterns, you can craft popular Minecraft banner design ideas that not only decorate your world but tell its unique story, one vibrant flag at a time. So grab your wool, dyes, and patterns—it's time to weave some magic!